Assets
An Asset is any valuable Item owned by a Company.
Furniture, computers, mobile phones, printers, cars, manufacturing equipment are examples of assets. Generally, an asset is a tangible item that is located on the company premises or is carried by an employee. In some cases, an asset could be an intangible item.
An asset's useful life spans across multiple years and hence its economic value is spread over corresponding years from the accounting perspective. If you buy a printer for $300 and it is expected to be useful for three years, from the accounting perspective $100 is recorded as the expense for three years each instead of all the $300 in the first year. Most countries have rules for such calculations.
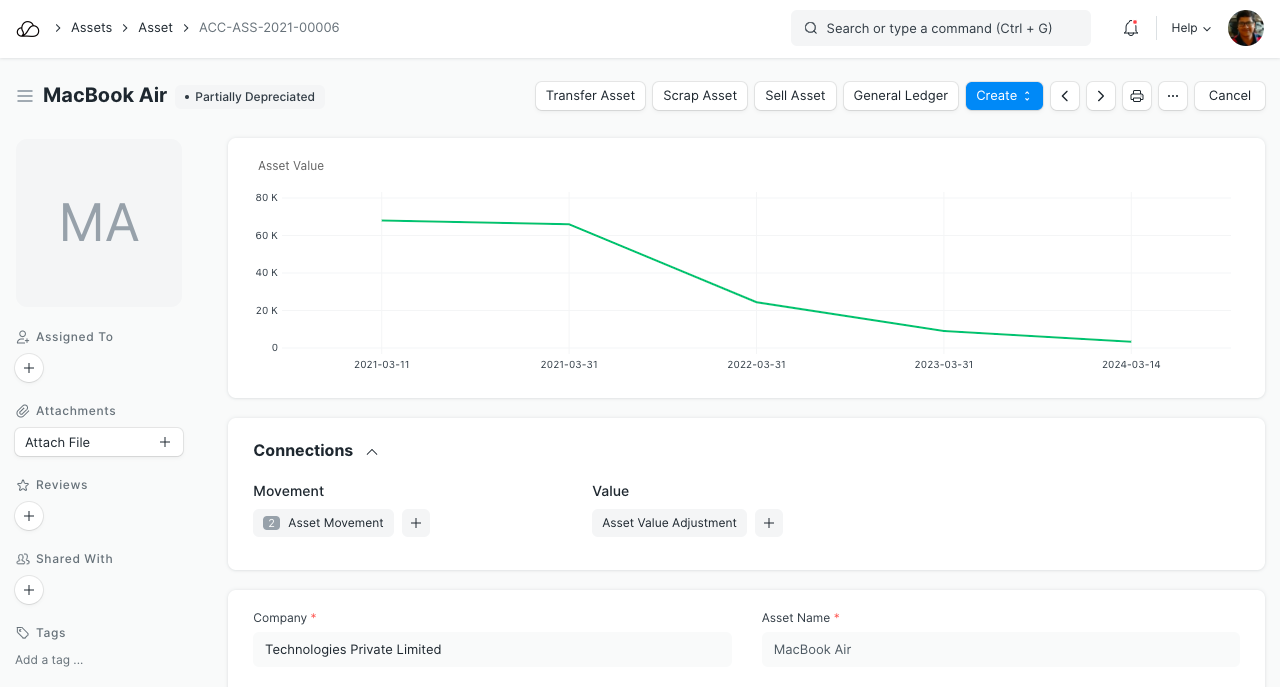
In OneOfficeERP, the Asset record is the heart of asset management module. All the transactions related to an Asset like purchasing, depreciation, maintenance, movement, scrapping, sales will be recorded against the Asset record.
To access the Asset list, go to:
Home > Assets > Assets > Asset
1. Prerequisites
Before creating and using Asset, it is advised to create the following first:
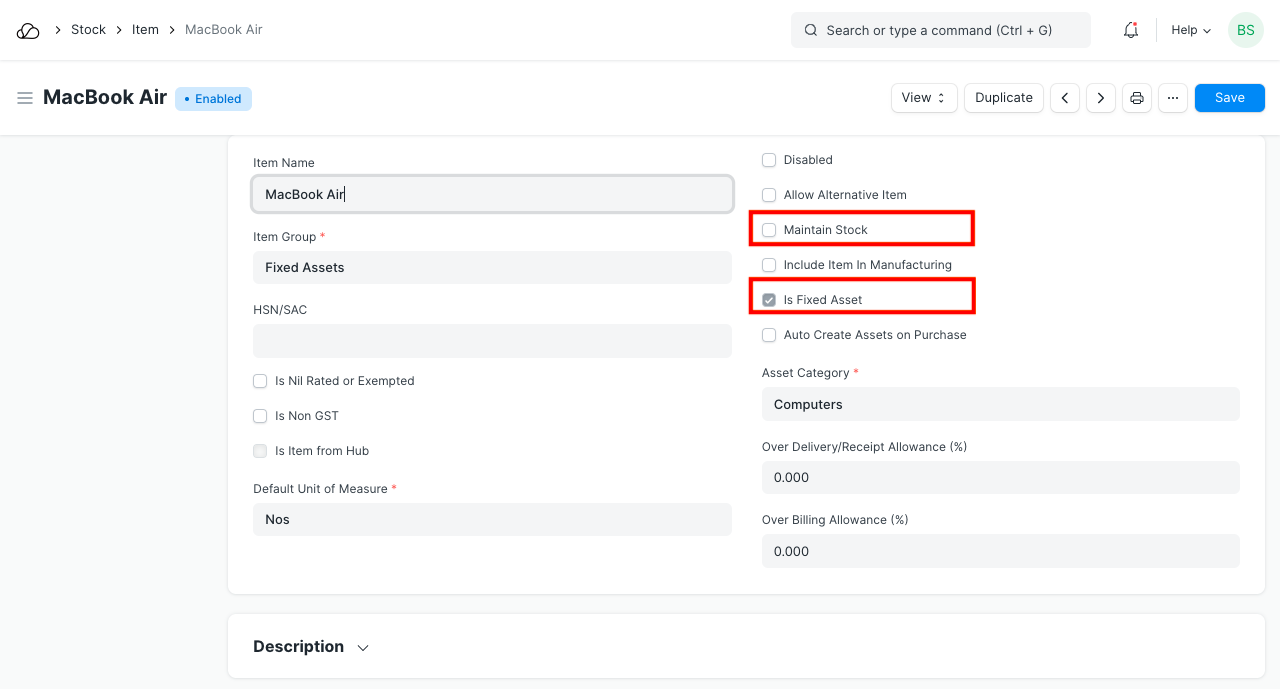
- Item with 'Is Fixed Asset' enabled.
- Asset Category
2. How to create an Asset
An Item representing the asset should be created. The 'Maintain Stock' should be unchecked and 'Is Fixed Asset' must be checked.
2.1 Auto creation of assets
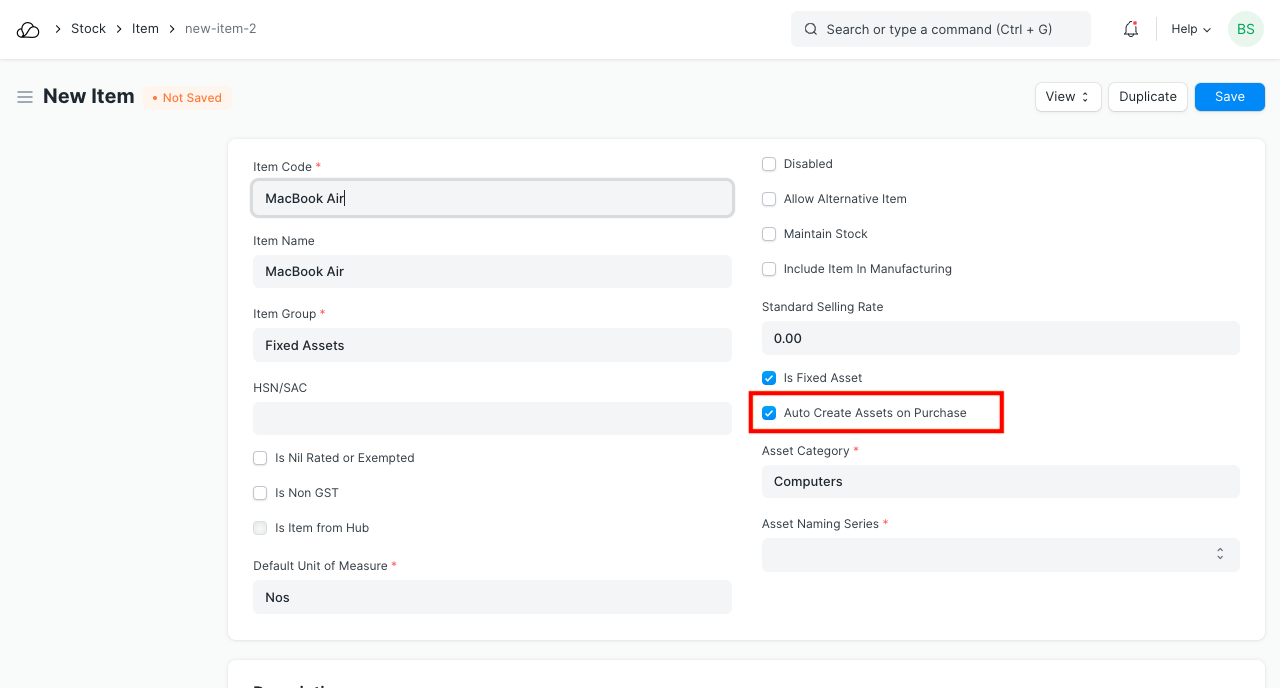
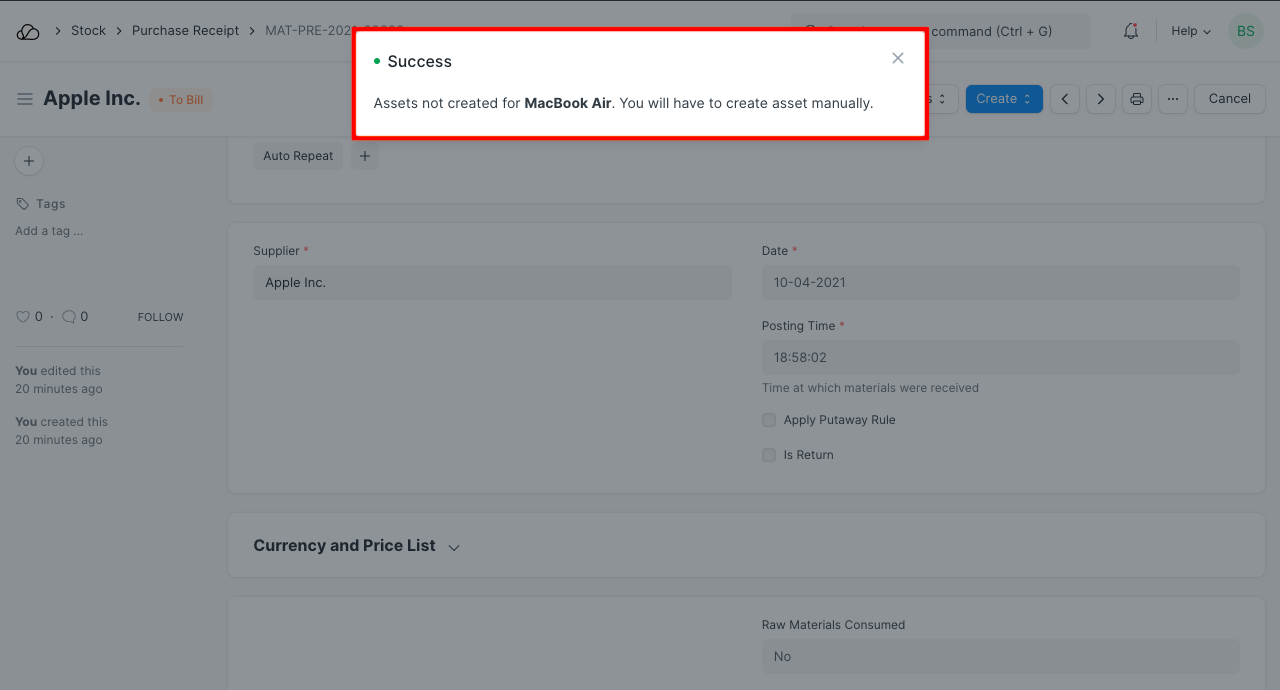
You can configure OneOfficeERP to automatically create assets on submission of Purchase Receipt by enabling 'Auto Create Assets on Purchase' in Item.
If you have enabled auto asset creation for the item representing an asset, you will have to provide the asset location while submitting the Purchase Receipt.

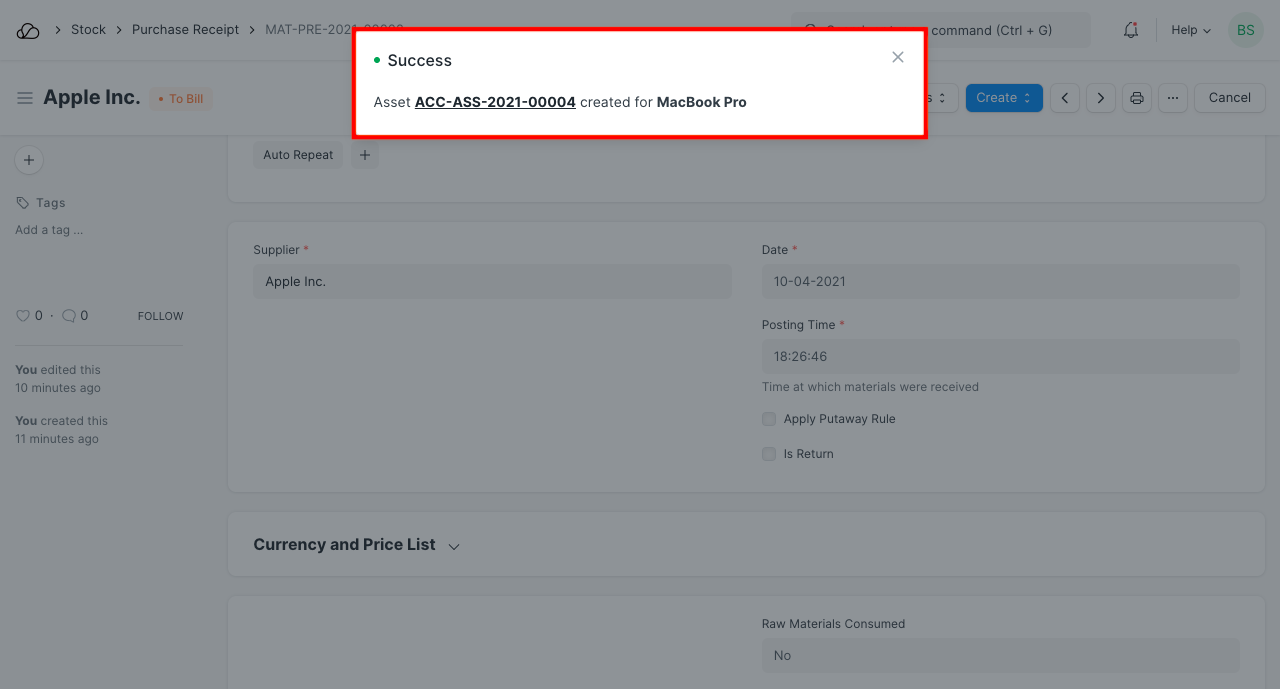
A message confirming the creation of assets is displayed on submission of Purchase Receipt.
2.2 Manual creation of assets
If you would like to create assets manually, create an Item with 'Is Fixed Asset' enabled and leave 'Auto Create Assets on Purchase' unchecked . On submission of a Purchase Receipt/Purchase Invoice with that Item a message is shown indicating that you need to create assets manually.
Follow below steps to create assets manually.
- Go to the Assets list, click on New.
- Enter a name for the asset.
- Select the Item Code. Item Name and Asset Category will be fetched automatically.
- Select the Asset Owner, i.e. Company, Supplier, or Customer.
- Select the Company/Supplier/Customer.
- Select the Purchase Receipt/Purchase Invoice. Purchase Date and Gross Purchase Amount will be fetched automatically.
- Select a Location. Eg: Mumbai Office. This will be fetched automatically if specified in Purchase Receipt items table
- Set Available-for-use Date. The depreciation will be calculated starting from this date.
- Save and Submit.
Please note you need create one asset record for each asset you have bought. If you have bought five computers and have created just one Purchase Receipt with quantity set to five then you will have to create five asset records manually.
2.3 Importing existing assets
When you move from a legacy system to OneOfficeERP, you will have to add details of all the assets your company has purchased previously along with depreciation details of each asset.
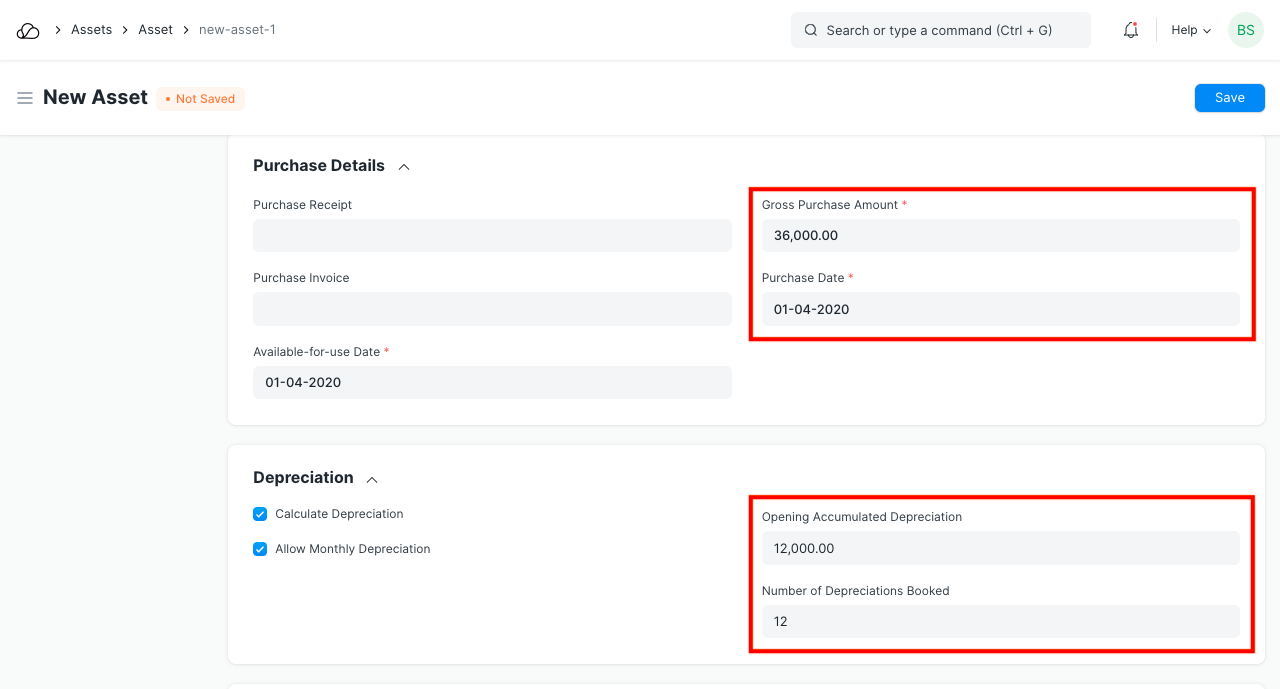
For an existing asset, you can create the asset record directly by checking "Is Existing Asset" checkbox and provide below details.
- Gross Purchase Amount
- Purchase Date
- Available-for-use Date
- Opening Accumulated Depreciation: The accumulated depreciation amount which has already been booked for an existing asset.
- Number of Depreciations Booked: Number of depreciation entries already booked.
Based on these details the schedule for depreciation of remaining amount will be created automatically.
To know more, visit the Purchasing an Asset page.
2.4 Additional options when creating an Asset
- Custodian: The employee who will carry the asset.
- Department: The department of the Custodian.
- Next Depreciation Date: Mention the next depreciation date, even if it is the first one. If the asset is an existing one and depreciation has already been completed, leave it blank.
- Calculate Depreciation: Enable this checkbox to calculate depreciation of Assets.
- Allow Monthly Depreciation: Enable this checkbox to distribute depreciation amount of an asset into 12 months of the year. Depreciation entries will be made every month on the date provided as Depreciation Start Date. For example, if Available for Use date is 22nd Nov 2019 and depreciation Start Date is 31st March 2020, first depreciation will be done on 30th Nov 2019 second on 31st Dec 2019 and so on. Amount will be distributed based on days left until next depreciation.
4. Features
4.1 Depreciation
- Frequency of Depreciation (Months): The number of months between depreciations.
- Total Number of Depreciations: The total number of depreciations during the useful life of the Asset. In case of existing assets which are partially depreciated, mention the number of pending depreciations. For example, if you set frequency as 12 months and no. of depreciations as 3, 1 depreciation will be booked every 12 months for 3 years.
- Depreciation Method: These are three methods used for depreciation :
- Straight Line: This method spreads the cost of the fixed asset evenly over its useful life.
- Double Declining Method: An accelerated method of depreciation, it results in higher depreciation expense in the earlier years of ownership.
- Written Down Value: In this method, the depreciation percentage is fixed but it is applied on the current value of the asset which we get after each depreciation. To know about Asset Depreciation in detail, visit this page.
- Depreciation Start Date: The date from which booking of depreciation will be started.
- Expected Value After Useful Life: Useful Life is the time period over in which the company expects that the asset will be productive. After that period, either the asset is scrapped or sold. In case it is sold, mention the estimated value here. This value is also known as Salvage Value, Scrap Value, or Residual Value.
- Rate of Depreciation: This will be calculated based on the amount entered in expected value after useful life.
4.2 Depreciation Schedule
On booking depreciations against this Asset, the Depreciation Schedule section will be visible. This table has columns for Finance Book, Schedule Date, Depreciation Amount, Amount Depreciated, and Journal Entry.
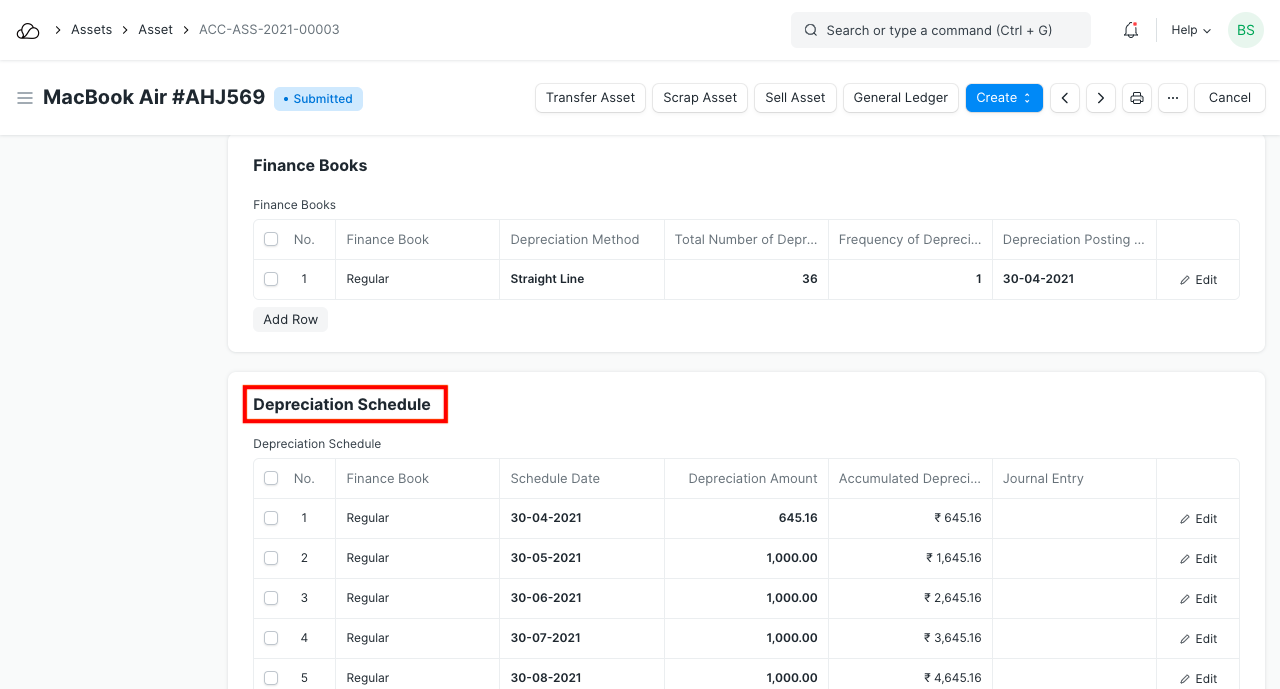
Note: The Finance Book column will only be visible if Enable Finance Book is checked in the Company Master. For more details, click here.
4.3 Insurance Details
If Insurance has been taken for the Asset you're recording, you can store the following Insurance details:
- Policy number
- Insurer
- Insured value
- Insurance Start Date
- Insurance End Date
- Comprehensive Insurance
4.4 Accounting Entries
On submission of an asset, "Capital Work in Progress" account will be credited and the asset account related to the asset will be debited. Submission is only possible after entering "Available-to-use Date". If "Available-to-use Date" is a future date, then accounting entry will be booked automatically on that date via the scheduler.
4.5 Maintenance
Ticking on Maintenance Required allows recording Asset Maintenance entries for this Asset. To know more, visit the Asset Maintenance page.
4.6 After Submitting
Once you create an Asset, you'll see options to transfer, scrap, or sell the asset. From the Make button, you can adjust its value and make a depreciation entry.